DIY sprinkler system layout diagram: backflow preventer, Orbit valve manifold, Schedule 40 PVC main line and lateral zones, swing joints, and Rain Bird pop-up heads — complete residential irrigation installation using Lowe's parts

Get Ready to Build Your Own Irrigation System

A DIY sprinkler system is one of the most valuable home improvement projects you can tackle. Done right, it protects your lawn investment, conserves water, and can save you thousands compared to hiring a contractor — all with quality components you can pick up at Lowe's.

🏡 Find everything you need for your DIY sprinkler system at Lowe's
Shop All Sprinkler Parts ↗
Complete sprinkler system layout diagram showing all components

What Goes Into a Complete Sprinkler System

Before breaking ground, it helps to understand every component you'll be installing from Lowe's:

  1. Backflow Preventer: Legally required safety device — PVB or RP type depending on your conditions
  2. Valve Manifold: Houses the zone valves that control when each area
  3. Main Line: 1" Schedule 40 PVC running from the backflow preventer to the valve manifold
  4. Lateral Lines: 1" and 3/4" PVC branches that deliver water to each sprinkler head
  5. Swing Joints: Flexible funny-pipe assemblies that connect heads to the lateral lines
  6. Pop-up Spray Heads: For smaller turf and bed areas (Rain Bird or Hunter)
  7. Rotor Heads: For large turf zones requiring longer throw distances
  8. Irrigation Wire: Multi-strand cable connecting valves to the controller
  9. Smart Controller: The brain of the system — schedules and optimizes watering automatically

Step 1: Designing Your Irrigation Layout

Head-to-Head Coverage — The Golden Rule

Head-to-head coverage is the single most important principle in sprinkler design. Every square foot of lawn must receive water from at least two overlapping heads. Each head must throw water all the way to its neighboring heads. See how it works visually with My Sprinkler Spacing Visualizer.

How to Measure and Map Your Yard

  1. Walk the perimeter with a measuring wheel or long tape measure
  2. Plant flags at property corners and any obstacles
  3. Record distances between flags
  4. Choose head types based on the distances involved
  5. Sketch the layout on graph paper or use My Sprinkler System Design Tool
📏 Shop measuring tools at Lowe's
Measurement Tools ↗
Square pattern sprinkler layout

Choosing Your Head Layout Pattern

Square Grid (Most Common for DIY)

A square grid pattern is the easiest to plan and execute, making it the go-to choice for most residential DIY projects. Heads sit at equal spacing in a straightforward grid with no complex geometry involved.

Triangular Pattern (Better Water Efficiency)

The triangular (or diamond) pattern requires more careful layout but delivers more even coverage with fewer dry patches and less wasted water overall.

Try both patterns side-by-side with My Sprinkler Spacing Visualizer to decide which works better for your yard shape.

Pro Tip: Use rotor heads for open areas wider than 20 feet and spray heads for narrow strips and beds. Mixing both types in the same zone causes uneven watering — keep them separate.

💦 Shop Rain Bird and Hunter sprinkler heads at Lowe's
Sprinkler Heads ↗
Professional irrigation system detail diagram

Irrigation Detail Generator: Build clean, professional-looking system diagrams with customizable pipe sizes and components, then export them as PNG files. Ideal for planning swing joints and valve manifold configurations before you dig.

Generate Details →

📥 Free Installation Diagrams: Download professionally drawn installation details for valve manifolds, backflow preventers, swing joints, stop & waste valves, and more — all created with the Detail Generator and ready to use on the job.

Download Free Details →
PVB backflow preventer diagram

Step 2: Selecting and Installing a Backflow Preventer

Why a Backflow Preventer Is Non-Negotiable

Every sprinkler system connected to a municipal or well water supply must have a backflow preventer by code. This device stops irrigation water — which can carry fertilizers, pesticides, and soil contaminants — from flowing back into your home's drinking water supply under a pressure drop.

PVB vs. RP: Which One Do You Need?

PVB (Pressure Vacuum Breaker):

  • The standard choice for most residential irrigation systems
  • Affordable, straightforward installation
  • Must be mounted at least 12" above the highest sprinkler head on the property
  • Available at Lowe's in 3/4" and 1" sizes

RP (Reduced Pressure Assembly):

  • Offers the highest level of backflow protection available
  • The correct choice when irrigation pipes run downhill or when back pressure is possible
  • Required if you use a chemical injection system (fertilizer, etc.)
  • Higher upfront cost, but superior long-term protection
🛡️ Shop code-required backflow preventers at Lowe's
Backflow Preventers ↗

💧 Know Your Flow Rate Before You Buy Parts

Bucket test method for measuring GPM

Your GPM (gallons per minute) determines how many heads each zone can run. Use our free GPM Measurement Tool — just time how long it takes to fill a 5-gallon bucket and the calculator handles the math.

Skipping this step is one of the most common (and costly) DIY mistakes. Measure first, buy second.

Measure Your GPM →

📸 Job-Site Installation Photos

Real installation photos from actual job sites — stop & waste, valve assembly, pressure vacuum breaker installation, sprinkler box cutting and fitting, valve solenoid wiring, and winterization drain setup.

Stop and Waste valve schematic

Step 2.5: Installing a Stop and Waste Valve

What Does a Stop and Waste Valve Do?

A stop and waste valve is an underground shutoff that does double duty: it turns off water to your entire irrigation system and automatically drains the pipes downstream when closed. This drainage feature is critical in freeze climates.

Why Install It Outside Rather Than Inside?

The location of the stop and waste valve — outside near your property's water connection rather than inside the house — is intentional and important:

  • Keeps Drainage Outside: The "waste" port releases water into surrounding gravel — the last place you want that is inside your home
  • More Available GPM: Tapping at the property line eliminates friction loss from your house, giving you more flow for your zones and potentially reducing the total zone count
  • Convenient Seasonal Access: Positioned right at the beginning of the irrigation system for a straightforward shutoff each fall
🚰 Shop Stop and Waste Installation Parts at Lowe's
Stop & Waste Parts ↗
Stop and Waste valve installation

Stop and Waste Valve Installation Steps

How to Install It

  1. Find Your Tap Point: Identify the main water line or meter connection where you'll splice in
  2. Dig to Frost Depth: Excavate below the local frost line — typically 18 to 36 inches depending on your climate zone
  3. Connect the Valve: Splice the valve into the water supply line using the appropriate fittings for your pipe material
  4. Pour a Gravel Bed: Surround the valve with 6 to 12 inches of clean gravel to allow drainage water to disperse
  5. Install the Access Sleeve: Run a 2-inch diameter pipe from the valve up to the access box above ground
  6. Backfill and Test: Refill the trench and verify the valve opens and closes correctly
  7. Cap with an Access Box: Set a flush-mount valve box over the installation for easy seasonal operation

Why "Waste" Is a Feature, Not a Bug

The small drain port in the valve body opens automatically when you shut the valve off. Water left in the downstream pipes drains into the gravel bed. Although the name sounds inefficient, this mechanism:

  • Prevents thousands of dollars in freeze damage each winter
  • Only releases the small volume of water trapped in the pipes
  • Operates just once per season during fall shutdown
  • Is a non-negotiable component for cold-climate systems

Pro Tip: Measure your available GPM from the stop and waste valve location rather than from an indoor tap. That measurement reflects the true flow available to your system after accounting for line loss from your home.

🚰 Shop Stop and Waste Installation Parts at Lowe's
Stop & Waste Parts ↗
Hose Bib Installation Diagram - Shows 3/4-inch hose bib with galvanized fittings and PVC connections

Optional Add-On: Installing a Hose Bib

Hose bib in use

Is a Hose Bib Worth Adding?

Tapping a hose bib off your sprinkler main line is an inexpensive addition that pays dividends year after year. You gain a convenient outdoor water source for hand-watering, rinsing equipment, filling buckets, and washing off muddy boots — all without running a separate line from the house.

Above-Ground Galvanized, Underground PVC

The standard approach uses galvanized pipe and fittings for the above-ground section — durable and weather-resistant — while transitioning to PVC underground where cost and ease of installation matters most. The galvanized-to-PVC transition is made with a standard threaded adapter.

🚿 Shop Hose Bib Installation Parts at Lowe's
Hose Bibs ↗ Galvanized Fittings ↗
Orbit preassembled valve manifold system

Step 3: Setting Up Your Orbit Preassembled Manifold from Lowe's

Why Go with an Orbit Preassembled Manifold?

Building a valve manifold from scratch is time-consuming. With the Orbit manifold system, the engineering is done, the valves are matched, and the whole assembly goes together with hand-tightening. Most residential systems need 2 to 6 valves depending on yard size.

What Makes Orbit Manifolds Stand Out

  • Fast Installation: Hand-tighten the swivel unions — no pipe wrenches, no thread compound required
  • L-Series Valves: 24 VAC solenoids that work with every major irrigation controller brand
  • Swivel Union Connections: Create leak-free seals and allow individual valves to be swapped out without cutting pipe
  • Expandable Design: Add or remove valves by simply threading or unthreading the swivels
  • Built for the Outdoors: UV-stabilized plastic rated to 600 PSI burst pressure
  • Universal Compatibility: Connects directly to 3/4" or 1" PVC or poly pipe
🔩 Shop Orbit Preassembled Manifold Systems at Lowe's
Orbit Manifolds ↗
Trenching for sprinkler pipes

Step 4: Trenching and Laying PVC Lateral Lines

Always Call 811 Before You Dig

This is not optional. Call 811 (or visit Blue Stakes) two to three business days before any digging. The free utility-locating service will mark the underground lines on your property — striking a gas, electric, or water line is a serious hazard and an expensive repair.

How Deep Do the Trenches Need to Be?

  • 1" Main Lines: 10 to 12 inches deep
  • 3/4" Lateral Lines: 8 to 10 inches deep
  • Within 24" of Utility Marks: Hand-dig only; follow your Blue Stakes notification guidelines

Trenching Options

  • Hand Digging: Best for small yards under 2,000 sq ft or tight spaces near utilities
  • Rental Trencher: Makes fast work of large open yards

📸 Job-Site Photos: Trenching

Real trench-digging photos showing hand-cut sod removal, rental trencher operation, driving pipe under concrete, stop waste valve excavation, and finished trench closeups from an actual residential installation.

Zone lateral piping layout

Sizing and Gluing Your PVC Pipe

Choosing the Right Pipe Size

Main Line (Backflow Preventer to Valves): Use 1" Schedule 40 PVC for systems running 9 to 16 GPM

Lateral Lines (Valves to Sprinkler Heads):

  • Begin with 1" pipe off the valve outlet
  • Step down to 3/4" after the first tee or once you've served the first third of the heads on that run
  • Carry 3/4" pipe all the way to the swing joint connections

How to Glue PVC Pipe Correctly

  1. Dry-fit the run first: Assemble everything without glue to confirm your layout
  2. Mark alignment: Draw a reference line across each joint so you can re-orient correctly when gluing
  3. Clean cut ends: Remove burrs, dirt, and moisture from pipe and fitting surfaces
  4. Prime both surfaces: Apply purple PVC primer to pipe and fitting socket — required on pressure lines
  5. Apply cement generously: Coat both surfaces with blue PVC cement immediately after priming
  6. Assemble quickly: Push pipe into fitting and twist to align within 30 seconds of applying cement
  7. Hold under pressure: Hold the joint together firmly for 30 seconds to prevent blowout
  8. Allow to cure: Wait a full 24 hours before operating or pressurizing the system, though most joints can be tested after 30 min. Read the label on your selected PVC cement to find the cure time informtion.
🛠️ Shop Essential Sprinkler Tools at Lowe's — The core toolkit for repairs and system upgrades
🩹 Shop PVC cement and primer at Lowe's
PVC Glue & Primer ↗

📸 Job-Site Photos: PVC Pipe Installation

Real PVC pipe photos from a working installation — 3/4" lateral lines in trenches, step-by-step PVC gluing, pipe layout patterns, tee connections, curved lateral runs, and the transition to funny pipe swing joints.

🧮 Calculate Exactly What Your System Needs

Complete sprinkler valve installation

Sprinkler System Calculator: Enter your zones and head types to generate a complete parts list, and material quantities — everything you need for a single Lowe's shopping trip.

Calculate Parts List →

Friction Loss Calculator: Check whether your pipe sizes will maintain adequate pressure at the farthest sprinkler head. Input flow rate, pipe diameter, and run length to get the numbers before installation.

Calculate Friction Loss →
Swing joint components from Lowe's

Step 5: Building Swing Joints for Every Head

Why Every Professional Uses Swing Joints

Swing joints are what separate a professional installation from an amateur one. The flexible funny-pipe assembly between the lateral line and the sprinkler head absorbs impacts from foot traffic, lawn mowers, and ground movement that would otherwise snap the pipe or crack the head body directly. Replacing a broken swing joint takes five minutes; replacing a cracked PVC tee buried in a trench does not.

The Four Key Benefits

  • Absorbs impact that would otherwise break the sprinkler head or tee
  • Makes fine-tuning head height after installation simple — just reposition the funny pipe
  • Adapts to soil settling over the first few seasons without pipe stress
  • Reduces lateral stress on glued PVC joints at the tee location
Pop-up sprinkler swing joint assembly diagram

Assembling a Pop-Up Swing Joint

Step-by-Step Assembly (Lowe's Parts)

  • Glue the Tee: Solvent-weld a 3/4" x 1/2" threaded tee into the lateral line at each head location
  • Thread in the Bottom Elbow: Screw a 1/2" funny elbow into the tee's threaded outlet
  • Cut Funny Pipe to Length: Measure and cut 1/2" funny pipe — typically 6 to 12 inches per head
  • Attach the Funny Pipe: Push the pipe firmly onto the barb of the bottom elbow until it seats fully. Use a wiggling motion while pushing to more easily press the fitting on
  • Add the Top Elbow: Push a 1/2" or 3/4" funny elbow onto the top end of the funny pipe
  • Thread on the Marlex: Screw a 1/2" or 3/4" marlex street elbow onto the funny elbow threads
  • Mount the Head: Thread the sprinkler head onto the marlex elbow and adjust height

Funny Pipe Length vs. Flow Rate

  • 6–8" runs: Safe for heads up to 5 GPM
  • 10–14" runs: Maximum 4 GPM spray heads
  • Over 18": Keep heads at 3 GPM or less to maintain adequate pressure
⚙️ Shop Essential Sprinkler Tools & Components at Lowe's — Quality parts for irrigation pros and DIY enthusiasts

📸 Job-Site Photos: Sprinkler Head Assembly

Real sprinkler head photos from an actual installation — swing joint assembly with funny pipe, cutting funny pipe to length, installing barbed tees, flushing laterals before heads go in, backfilling around heads.

Head Spacing Reference and Coverage Troubleshooting

Spacing Guidelines by Head Type

Head Type Recommended Spacing
Spray Heads (5–15 ft throw) Space equal to throw radius
Rotary Nozzles (10–35 ft throw) Space equal to throw radius
Rotor Heads (20–50 ft throw) 80–90% of throw radius

Common Coverage Problems and Fixes

  • Dry patches: Heads are spaced too far apart or system pressure is too low
  • Soggy areas: Inconsistent head coverage — consolidate coverage or reduce run times
  • Uneven watering: Spray heads and rotors mixed on the same zone — separate them
  • Misting or fogging: Pressure too high — install a pressure regulator at the valve or head
Sprinkler valve wiring with color-coded wires

Step 7: Running Irrigation Wire from Lowe's

Selecting the Right Wire

Pick up multi-strand irrigation wire from Lowe's. It comes in 3-, 5-, 7-, and 9-wire bundles. Choose a bundle with at least one more conductor than you have zones — the extra wire is your common return.

Color-Coding Your Wires

Common Wire: Pick one color (white is the industry standard) and run it to every single valve. This wire connects back to the "C" or "COM" terminal on your controller.

Zone Wire Colors Example (one per valve):

  1. Zone 1: Blue
  2. Zone 2: Green
  3. Zone 3: Yellow
  4. Zone 4: Orange
  5. Zone 5: Red
  6. Zone 6: Purple

Wiring Steps

  1. Trench from Controller to Valve Box: Run wire in the same trench as your main line wherever possible
  2. Leave Service Loops: Add 12"-24" of slack at each valve and at the controller — you'll thank yourself later
  3. Remove outer wire sheath: Use the provided pull string or a razor knife, carefully cut the sheath along the wire back 4 inches and remove this section to expose the wires
  4. Strip the Ends: Remove 1/2" of insulation from each wire end
  5. Connect at Each Valve: One common wire plus one unique zone wire per valve
  6. Waterproof the Splices: Use grease-filled wire connectors from Lowe's — standard wire nuts will corrode underground
Shop Sprinkler Automation Essentials at Lowe's — Timers, sensors, and smart devices for hands-free watering
Automation ↗
Smart irrigation controller from Lowe's

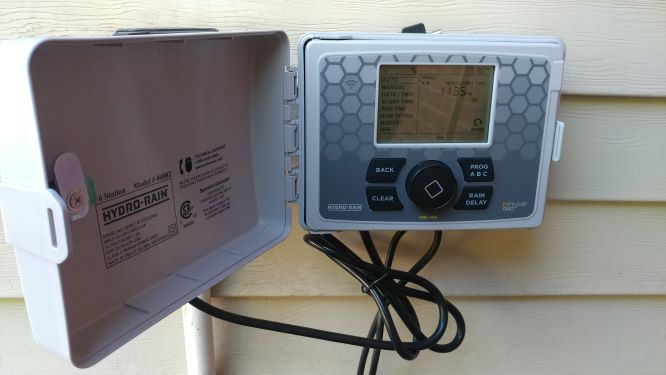
Step 8: Mounting Your Smart Irrigation Controller

Why a Smart Controller from Lowe's Is Worth It

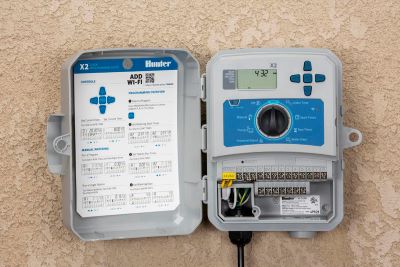
Smart controllers from Lowe's — including Rain Bird, Orbit, and Rachio models — automatically adjust run times based on local weather data. They can cut outdoor water use by up to 50% and may qualify for utility rebates of $250 or more in many municipalities.

Smart Controller Features to Look For

  • Automatic weather-based schedule adjustments
  • Remote operation and monitoring via smartphone app
  • Seasonal run-time percentages for easy summer/fall adjustments
  • Built-in rain and freeze delay functions
  • Flow sensor compatibility for leak detection (select models)
  • EPA WaterSense certification for utility rebate eligibility

Matching Controller to Your Budget

Basic Timer: $40–$120 — manual programming, reliable, no app

Smart WiFi Controller: $80–$350 — weather-based scheduling, smartphone control

Commercial Smart Controller: $350–$10,000+ — advanced diagnostics, flow monitoring, multi-decoder support

💧 Shop Smart Controllers at Lowe's — Save 50% on water + get $250 rebates!
Smart Controllers ↗

Controller Mounting and Programming

Where to Mount the Controller

  1. Pick a Protected Spot: Garage wall, covered patio, or utility room — out of direct weather
  2. Near Power: Choose a location within reach of a 120V outlet
  3. WiFi Signal: Confirm your home network reaches the location for smart controllers
  4. Comfortable Height: Mount 4 to 5 feet off the floor for easy reach
  5. Secure Mounting: Drive screws into wall studs or use appropriate wall anchors

Wiring the Controller Terminals

  1. Strip 1/2" of insulation from each wire end
  2. Insert the common wire(s) into the "C" or "COM" terminal and tighten
  3. Connect each zone wire to its numbered terminal in order
  4. Snug each terminal screw firmly — loose connections cause intermittent zone failures
  5. Tuck excess wire neatly into the controller cabinet
  6. Close and latch the cabinet door

⏱️ Stop Guessing — Calculate Your Zone Run Times

Smart irrigation controller timer

Zone Run Time Calculator: Get science-based run times for spray heads, rotors, MP Rotators, and drip emitters. Proper scheduling keeps your lawn healthy without wasting water or overwatering.

Input your head types, coverage area, and local soil conditions to get a precise watering schedule tailored to your system.

Calculate Zone Runtimes →

Testing the System Before You Backfill

Pre-Backfill Testing — Don't Skip This

Run every zone while the trenches are still open. Fixing a buried leak requires re-excavation. Catching it now takes minutes.

  1. Pressurize the entire system and walk all connections looking for leaks
  2. Manually open each valve at the manifold to confirm it operates
  3. Activate each zone from the controller to verify the wiring is correct
  4. Watch all heads to confirm they pop up and/or rotate properly
  5. Walk the coverage pattern and look for dry gaps or excessive overlap
  6. Adjust arc and radius settings on any heads that need it
  7. Mark heads requiring further adjustment with flags

Diagnosing Common Problems

Low Pressure:

  • Verify the backflow shutoff valves are fully open
  • Check the main line for leaks at glued joints
  • Too many heads on the zone — split into two zones

Valve Doesn't Activate:

  • Trace and re-check wire connections at both ends
  • Test the valve manually using the solenoid or bleed screw
  • Replace the solenoid if the valve responds manually but not electrically

Uneven Coverage:

  • Adjust nozzle arc and radius to match adjacent heads
  • Relocate or add a head to eliminate dead spots
  • Remove debris from clogged nozzle filters

Wrapping Up

Final Installation Steps

  1. Backfill the Trenches: Backfill and fill the trenchs then tamp soil firmly and grade flush with the surrounding lawn
  2. Re-Lay or Seed: Replace salvaged sod or spread seed over disturbed areas
  3. Dial In Coverage: Fine-tune head arcs and heights after the soil has settled for a week
  4. Set the Schedule: Program an efficient watering routine based on your head types and local evapotranspiration rates
  5. Document the Layout: Photograph or sketch the pipe runs and head locations — you'll want this for future repairs

What Does DIY Really Save You?

DIY vs. Contractor Cost Comparison

Professional Installation: $5,000 – $10,000 for a typical residential yard

DIY with Lowe's Materials: $1,500 – $3,500 in parts

Total Savings: $3,500 – $6,500 or more

Typical Material Budget from Lowe's

  • Backflow Preventer: $350–$850
  • Zone Valves (3 zones): $120–$380
  • PVC Pipe, Fittings & Cement: $450–$1,500
  • Sprinkler Heads (20 units): $250–$500
  • Irrigation Wire & Connectors: $50–$100
  • Smart Controller: $150–$300
  • Tools (if purchasing): $50–$400 ⚙️ My Favorite Tools For Installation

Ongoing Savings After Installation

  • Smart controller water savings: $100–$600 per year
  • Potential utility rebates: $50–$250
  • Ability to diagnose and repair your own system: long-term peace of mind
🚀
Ready to Start Your DIY Sprinkler Installation?
Lowe's carries everything you need — from backflow preventers and PVC to smart controllers and irrigation wire
Shop Lowe's Now ↗
DIY sprinkler system layout diagram showing backflow preventer, Orbit valve manifold, PVC main and lateral lines, swing joints, and Rain Bird heads — full residential irrigation install with Lowe's parts

Complete System Layout Reference Diagram

This overview diagram shows how every component in this guide connects together — backflow preventer, valve manifold, lateral lines, swing joints, and sprinkler heads — in a finished residential system layout.

Save the PNG for a quick on-screen reference or download the PDF for a high-resolution print you can take into the field.